Outlook Web App Title Bar

If you've used the Outlook Web App in the past, you were likely unimpressed.  I was.  Until the latest version (number 14), that is.  It's not GMail, but it's absolutely above the "usable" threshold, which is awesome.  And I might add that I'm using it in Firefox on Linux – not Microsoft's favorite platform.  However, it does have one major usability issue: you can't see how many unread messages you have in your inbox without opening the window.  But fortunately, through the magic of GreaseMonkey, that's easy to fix:

// ==UserScript==
// @name           Outlook Web App More Gooderer
// @namespace      owa.barneyb.com
// @include        https://*/owa/
// @include        http://*/owa/
// ==/UserScript==

(function() {
  var originalTitle = unsafeWindow.document.title
  var f = function() {
    var ss = unsafeWindow.document.getElementsByTagName('span')
    for (var i = 0, l = ss.length; i < l; i++) {
      if (ss[i].getAttribute('fldrnm') == 'Inbox') { // 'Unread Mail' is also reasonable
        var children = ss[i].parentNode.childNodes
        var count = 0
        if (children.length == 2) {
          count = children[1].childNodes[1].innerHTML
        }
        unsafeWindow.document.title = 'Outlook ' + (count == 0 ? '' : '(' + count + ')')
          + ' - ' + originalTitle.split('-')[0]
        break
      }
    }
  }
  setInterval(f, 15 * 1000)
  f()
})()

Just drop that into a new user script, ensure the @include directives will match your OWA endpoint, and reload.  Now when the app loads it'll tweak your titlebar to put the useful info (unread message count) in there over to the left and move the useless information (your own name) over to the right.  Much better.  It'll also redo the same check every 15 seconds, so your title bar stays up to date while the window is minimized.  YAY!

Is this the most elegant solution to this problem?  No. Is it even an elegant solution?  Probably not.  Does it work and remain unintrusive?  Absolutely.  If you want to help with the first consideration, drop me a line.  In particular, some sort of event-driven approach would be far better so you don't have to wait for the 15 seconds to elapse before changes are reflected in the title bar.  If you're like me, you probably don't care enough to dig into it to that level, but if you have the time/knowledge/desire, please drop me a line.

ColdFusion null Gotcha

As you probably know, CFML doesn't have any concept of nulls within it's own type system. It has some facilities for dealing with nulls due to interfaces with other type systems (e.g., from Java or JavaScript).  At least on ColdFusion, it's not perfect.  Consider this code:

s = {
  'javaCast' = javaCast('null', 0),
  'json' = deserializeJson('null')
};
structKeyExists(s, 'javaCast'); // false
structKeyExists(s, 'json');     // true
structKeyExists(s, 'missing');  // false
isNull(s.javaCast); // true
isNull(s.json);     // false
isNull(s.missing);  // true

As you can see, there is no difference between null and missing.  However, the null from the JSON gets deserialized not as a null, but as "null" (i.e., the string containing the letters 'n', 'u', 'l', and 'l'). Wait, what?

I don't think there should be any confusion about how contrived this example is.  However, the issue manifests itself any time you're deserializing JSON packets with ColdFusion.  So watch out.

Holy Cock Pants, Batman!

So after getting my dose of bagpipes for the evening, I was playing on Kim's computer and discovered there is exactly one page in Google's index containing the phrase ""holy cock pants, batman!"

Aside from the obvious awesomeness of the phrase, I was rather surprised to find a relatively short phrase with exactly one instance in Google's index on my first try.

Unfortunately, by telling the story of my triumph I'm also ensuring no one else can ever experience the same triumph.  It's sort of sad.

setTimeout/setInterval Bug in Android 2.2 WebKit

If you develop web apps for Android devices, there's a really gnarly bug you should be aware of: setTimeout and setInterval will never fire while the soft keyboard is open.  When the soft keyboard closes, all the queued up timeouts/intervals will unspool all at once, which is not terribly good, but better than them disappearing.  Note that it's the timer checks which are put into stasis, so you'll get at most one fire per setInterval, regardless of how long the keyboard was open (e.g., a 500ms interval will fire once, even if they keyboard is open for many seconds).

The most damning place this bug rears it's head is with autocompletion scripts on form fields.  You necessarily focus the field, bringing up the keyboard, in order to interact with it.  But as soon as you do all your JS can't do timer-based actions.  If you have a naive implementation that responds directly to key events, you'll be ok, but particularly if you're doing remote data retrieval for the autocomplete dropdown, you're going to delay responding to key events so you can collapse multiple events which are temporally close into a single remote call.  Which means you're never going to get to making that call until the user removes focus from the form field.  Oof.

In many cases, you can code around the bug with a little trickery.  For example, on a key event, you can record the current time, and then set your timeout.  On the next key event, if your timeout hasn't triggered, but it's been longer than the delay, you can switch the autocomplete mechanism into direct invocation mode.  Hardly ideal, as it requires manual coding for every timeout/interval structure you have in your code, but it does work, and doesn't make everyone pay the price for the Android bug.  For simple autocomplete, this works reasonably well, but it doesn't do so hot for more complex situations.

Hopefully Google will get the bug (Issue 13540) fixed in the near future, and carriers will allow the update to trickle out to their devices.  But even in the best case scenario, that's still months away.

Lego Ad

Lego Ad

Minor Shortcodes Update

Last winter I released a CFML port of the WordPress Shortcodes functionality.  It's proven both very useful and very flexible in the real world, exactly as I'd hoped it would.  I tried to make a very direct port of the PHP, but after using it on a number of projects, I found myself reimplementing the same wrapper functionality, so I decided to move that into the core.

The mods are very simple, just the addition of an 'addAll' method.  Consider this code:

sc = new shortcodes.shortcodes();
sc.add("time", new shortcodes.time());
sc.add("latex", new shortcodes.latex());

It can now be expressed like this:

sc = new shortcodes.shortcodes();
sc.addAll({
  'time': new shortcodes.time(),
  'latex': new shortcodes.latex()
});

The really handy part, however, is that there is also a 'setShortcodes' alias for the 'addAll' method, so you can use it within setter-injection frameworks (e.g., ColdSpring).  So you can configure your shortcode engine with your DI framework of choice without needing an intermediary as you've had to use to this point:

<bean id="shortcodes" class="shortcodes.shortcodes">
  <property name="shortcodes">
    <map>
      <entry key="time">
        <bean class="shortcodes.time" />
      </entry>
      <entry key="latex">
        <bean class="shortcodes.latex" />
      </entry>
    </map>
  </property>
</bean>

As you might imagine, this allows you to use your normal DI infrastructure to configure your shortcode implementations, which is a huge boon.  The ColdSpring (and Spring) syntax for maps is a little verbose, but it's not too bad, and it lets you keep all your wiring in one place without resorting to wrapper beans or weird factory setups.

So no functional changes to the actual implementation, just easier to use.  I've also bundled 'time' and 'date' shortcode implementations to go along with the original \LaTeX implementation.  They're much more simplistic, which will hopefully do a better job of helping people get started implementing their own shortcodes (as well as providing some more utility out of the box for integrators).

As always, for full details and up-to-date info you should visit the project page, check out the online demo, or grab source from Subversion.

OSX-Ordered Buttons

If you've used both Windows and OSX, you've probably noticed that the standard button ordering is different.  For a simple confirm dialog, Windows typically renders the buttons centered at the bottom of the dialog, with the 'OK' button to the left of the 'Cancel' button.  On OSX, the buttons are rendered to the right at the bottom of the dialog, with the 'OK' button to the right of the 'Cancel' button.  This corresponds to the inversion of window minimize/maximize/close buttons as well (Windows to the top right and OSX to the top left).

If you're building a web app, you're necessarily trying to serve all your customers with a single interface, but you can still give them a familiar user experience with a minimum of fuss.  Not only can you, but you should.  The best part is that you can do much of it purely with CSS and JS, without having to touch your serverside at all.

Here's a jQuery snippet that deals with the button order problem:

jQuery(function() {
  var c = jQuery(".osx input[type=submit]").parent()
  c.css("text-align", "right")
    .children().each(function() {
      c.prepend(" ").prepend(jQuery(this).remove())
  })
})

As you can see I simply grab any element directly containing a submit button, invert the order of it's children, and right align them.  Note the ".osx" in there – that's really important.  Somewhere else (maybe JS, maybe serverside, whatever) the OS of the user will be checked and the "osx" class will be added to the HTML element if appropriate, allowing me to target only OSX visitors with custom stuff.  You could just as easily do it in the other direction (emit HTML w/ OSX ordering and flip it around to Windows ordering).

Here's some CSS to style buttons a little differently:

.osx input[type=submit] {
  border: 1px solid #2b269a;
  background-image: url(osx-button-bg.png);
  border-radius: 6px;
  font-family: Verdana;
}

These are trivial examples, but they illustrates just how simple it is to help make your users feel more at home.  Foisting an inconsistent user experience on your application's users does them a disservice.  People are unfortunately used to having to think extra hard when they cross over into a browser, but there's no reason to make them pay that price.

Identity, State, Time, and Software

A few weeks ago Sean Corfield posted another entry on the "is OOP good?" debate, and while the post was specifically about a comment he received on a previous entry, he linked to a very interesting recording of a presentation from the JVM Languages Summit by Rich Hickey: Are We There Yet? – a talk about state, identity, value, time and other concepts.

The talk is just over an hour long, and worth listening to if you ever plan on developing software in the future (regardless of language/platform/architecture/whatever).  Rich is obviously a proponent of functional programming, but his talk is more of a travelogue through the issues that have come up and been addressed (and not addressed) over the history of computer programming.

I found his discussion of persistent data structures and MVCC (multi-versioning concurrency control) particularly interesting, and certainly relevant for anyone who has ever used a database transaction and/or dealt with the "shopping cart to purchase" transition in an ecommerce app.

Another point he made (though indirectly) is that syntax is really irrelevant.  I write a lot of Groovy in addition to CFML, and I much prefer the object-centric nature of the Groovy syntax over the function-centric nature of CFML syntax.  That said, Groovy is the one that is closer to the concepts of functional programming (specifically with immutable state).  Not perfectly, mind you, but at least it's possible to think that way while it's impossible with CFML.

[1, 2, 3, 4, 5, 6, 7].findAll { it % 2 }.sort // object-y
sort findAll [1, 2, 3, 4, 5, 6, 7] { it % 2 } // function-y
a = [1, 2, 3, 4, 5, 6, 7]; findAll a, {it % 2}; sort a; // cfml-y

All three lines above do the same thing: take a literal list, pluck out the odd numbers, and return them in sorted order.  The first is a object-y syntax (a la Groovy), the second is function-y syntax (a la Haskell).  The third is CFML-y, with mandated modify-in-place so you have to mutate state, which is annoying.  Really annoying.  I want the behaviour of line two with the syntax of line one (at least as an option).

But really the point of my addled rambling is to really encourage everyone to go watch that presentation from Rich.  It's worth it.

Amazon S3 CFC Now Supports Paged Lists

The initial implementation of the listObjects method on my Amazon S3 CFC didn't include any means for paging through records.  The default behaviour of S3 when doing a listObjects request (a GET of the bucket) is to return the first 1000 keys in alphabetical order, and then truncate the result.

There are now two more parameters to the listObjects method on the CFC:

  • startAfter[""] – The object key to start the listing after (corresponding to the 'marker' parameter in the raw S3 API), defaulting to the empty string (which is before the first object key).
  • maxResults[1000] – The number of results to return (corresponding to the 'max-keys' parameter in the raw S3 API), defaulting to 1000.

This is a simple, but rather atypical way to do paging, so a brief bit of psuedo-code is in order:

s3 = new S3("MY_AWS_KEY", "MY_AWS_SECRET");
pageSize = 10;
items1To10 = s3.listObjects('s3.test.com', '', '/', '', pageSize);
items11To20 = s3.listObjects('s3.test.com', '', '/',
  items1To10.objectKey[items1To10.recordCount], pageSize);

As you can see, the second page of results is retrieved by passing the last object key from the first page as the 'startAfter' parameter.  Note that S3 always returns object keys in alphabetical order, so all paging operations are using that ordering.

In addition to these two new parameters to listObjects, both listObjects and listBuckets now return extended metadata including both the standard fields (executionTime, cached, recordCount, and columnList) and extra S3-specific metadata.  In particular, listObjects returns an 'isTruncated' field indicating whether the listing was truncated (meaning there are more keys to retrieve).  Very helpful in determining whether you need to look for another page of records.

Some psuedocode for this might look like this:

s3 = new S3("MY_AWS_KEY", "MY_AWS_SECRET");
pageSize = 10;
items1To10 = s3.listObjects('s3.test.com', '', '/', '', pageSize);
if (items1To10.getMetadata().getExtendedMetadata().isTruncated) {
  // ... fetch next page ...
}

Just for reference, the extended metadata is what is returned when you use the 'result' attribute on a normal CFQUERY tag.  That same data is available from the query result (what you pass to the 'name' attribute of CFQUERY) via the syntax above.  So you can always get the SQL, execution time, cache status, etc from any query result, even if you don't have a reference to the 'result' attribute's variable.  Forgive the confusing nomenclature, the attribute names are really screwed up, so here's some psuedocode that will hopefully illustrate:

<cfquery name="myQuery" result="myMetadata">
  select ...
  from ...
</cfquery>
md = myQuery.getMetadata().getExtendedMetadata();
assert md.sql EQ myMetadata.sql;
assert md.executionTime EQ myMetadata.executionTime;
assert md.equals(myMetadata);

This is handy for query results which are returned from CFC methods, for example, where you can't use the 'result' attribute.

Development of these new features was sponsored by Gaurav Malik and CSSTC.

Quadrilla

If you don't know, Quadrilla is a simple modular wooden marble run.  The kids spent much of the day running marbles through a couple of the instructions-included models.  Not just one at a time either; the only thing constraining the number of marbles running at any given time was the speed which they could pick them up off the floor and the number they could hold in their hands.  I'd wager max concurrency at somewhere around 70 marbles.  The kids are obviously fascinated by making the marbles go all crazy, but after knocking down the first setup, their attempts at building one on their own were quickly abandoned.  I cracked open the instructions and built another model, and they kept playing.

After they were in bed, however, I thought I'd try my hand at building a totally custom model.  You remember when I said "simple" earlier?  I was totally lying.  The rules for construction are incredibly simple, but the complexity enforced by the modules themselves is rather high.  It seems like there is a lot of flexibility with the different blocks, but while that's not inaccurate, the flexibility is within a world of draconian constraints.

Anyway, after 83 test marbles over the course of about an hour and a half, I managed to assemble a model that I'm reasonably pleased with.  I had a few design goals  in mind from the get-go:

  1. must have a single marble entry
  2. must have a single marble exit
  3. must use the 90° flip-flop (none of the instructions-provided models did)
  4. must use a bunch of 180° flip-flops
  5. every bit of raceway must be reachable (no dead or partially dead segments)
  6. no bit of raceway may be reshared after splitting (all the instructions-provided models rejoined before resplitting)
  7. minimize the number of test runs (both the kids and my parents was already asleep)

The 90° flip-flop was a pain in the butt to use, but that's mostly due to the fact that the set I was using was the Twist set, so the segments were all curves.  If the segments were linear (as in the Rail set), it probably would have been easier.  I only used two 180° flip-flops for their intended purposes (the rest served as "dumb" support blocks in the unused levels of the columns).  I'd hoped to use more, but goal #6 prevented it with the pieces I had available.

I won't know until morning if I succeeded at #7, but I think I did.  At the very least, I wasn't louder than the howling winds outside.

The trickiest part was managing vertical space while still meeting goal #6.  I managed to only have two columns with three layers of "dead" modules, and one of those was just so I could use the second helix (spiral, frying pan, whatever) as a launch point.  The module which would have made it far easier would have been a vertical 90° flip-flop, but there is no such thing.

Overall, however, I managed to build what I'd hoped to.  After the first fifteen or twenty minutes, I wasn't so sure I was going to be able to pull it off.  It seemed like everything I wanted to do wasn't allowed by the modules available.  But I managed to figure out how to solve the problems other ways, or at least reroute to avoid the problems, and got it done.

Here's a few pictures I took of the finished product:

This is the front of the model.  The marble exit is the green module at the center of the bottom curved section.  Since there are four paths, there are four ways to get to that block: from the left, from the right, from the helix, and from the raceway that ends under the helix.  The first natural module above the exit module is shared between routes three and four, but it's not raceway, so it doesn't violate goal #6.

The exist was the first bit I threw together.  I liked the concavity, so I kept it.  It was a pain to maintain that arrangement as I got further along, but I got it to work.  It also makes for a nice pile of marbles in that cavity after you run a bunch through.

You can see all three flip-flops here as well: the two 180° flip-flops are the red modules with the large grey dots (center-center and right-rear columns), and then 90° flip-flop is the red module spitting out onto the lower helix.

You'll also notice the purple spacers in the center-center and center-front columns – they could have been placed below the lower helix in both columns without interfering with any raceways and avoid the unnecessary two-plate drop out the front of the 90° flip-flop (there would still be a one-plate drop).  As you'll see in the left-side photo, it would also have allowed me to use a module in the center-center column instead of five spacer place.  But by the time I had it all working, I didn't really want to tear it apart enough to make that change.
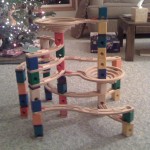
The left side of model shows route four (the raceway under the lower helix) better.  It originates in the right-rear column, and passes through the center-center column.

Marbles are introduced in the uppermost module, and all go through the first helix.  Exiting the helix they hit the first 180° flip-flop and are either routed to the right side (more later), or sent through a short out-n-back to come to the 90° flip-flop and either be sent to the lower helix or out to the left side to run the serpentine race to the front and exit.
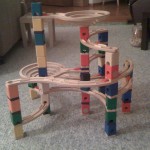
The right side has the second 180° flip-flop which either sends marbles along the right-side serpentine race to the front, or through another short out-n-back to the center-rear column before sending them through the central raceway to exit beneath the lower helix.

You can clearly see all three flip-flops from this view as well, though the 90° one just looks like a plain red module (other than the accelerator at it's front).

The final view of the back isn't terribly exciting aside from giving a better perspective on where exactly the right-rear, center-rear, and left-rear columns are in relation to one another.
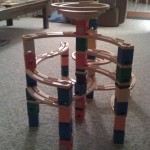
Interestingly, the center-rear column (closest to the camera) is completely floating.  It has a single anchor point: the right-rear column.  However, it's geometry is rigidly enforced by the 180° flip-flop that feeds it.  So it has to be pretty much exactly where it is.  I'd originally hoped to have the short out-n-back that it provides go all the way over to the left-rear column (eliminating the need for a center-rear column at all), but I couldn't interleave the two out-n-backs without that aforementioned vertical 90° flip-flop.

The rest of the structure is locked in it's relative arrangement because of the incompatibility of the large curved segments and the serpentine segments to mutually realign their vertices.  If the lower exit raceway (right-rear to center-front) wasn't there, then the whole thing could pivot (as it'd be basically a parallelogram), but that raceway locks a triangle into one of the corners, thereby locking the whole structure.

Here's to spiked eggnog and an evening playing with toys!  Happy Christmas, or whatever you're celebrating as this year draws to a close.